Friday, September 5, 2014

Our Typical Homeschool Day

Many people ask me what a typical schedule is like when homeschooling. As with every aspect of homeschooling, all families are different and benefit from diverse schedules which fit into their daily lifestyles. This is what a "normal" day at our house is like:
7:00-8:30 The kids wake up
8:00-9:00 Breakfast
9:00-11:30/12:00 School time with a snack break
12:00-1:30 Free play
1:30-2:30 Lunch
2:30-3:30 Foreign Language/Piano
3:30-5:00 Free play with a snack
5:00-6:00 Independent work
6:00-7:30 Dinner
7:30-8:00 Bedtime routine
8:00-8:45 Read/T.V.
The best thing about this year-round homeschool schedule is the flexibility. There are some days when the kids wake up at 6:30 a.m., and I am making breakfast before 7:30. However, on other days the kids won't wake up until 8:30 or 9:00. I usually let them sleep if I know they went to bed later than usual the night before, or they are not feeling well. Ultimately, I do not stress myself out completely to follow a routine, but I am sure to accomplish my weekly lesson plans.

Monday, September 1, 2014

Our Homeschool Approach

There are many diverse techniques and schedules which are beneficial to individual families. Everyone is different! There is not one right way to homeschooling, other than to make it the top priority. After all, you are providing your child or children's sole education. Scheduling is important, but routine is not everything. In my opinion, structure and information is more important than routine. For us, focusing on weekly objectives on a daily basis enables a broader achievement of goals. I utilize a weekly list of what needs to be learned for each subject, for each child, and then we make the best effort to accomplish and grasp the concepts. We homeschool throughout the whole year, with only holidays, birthdays, vacations, and sick days as days off from schooling. Yes, thats right, even on Saturdays and Sunday! When most children are happy to be off from their daily grind of waking up very early to get ready for a grueling time of making the effort to pay attention to a curriculum based on core standards, rather than to their individual needs, my children are getting the oppoetunity to enjoy their education. Therefore, my children are able to learn at a much more accelerated pace than those in a public school system, or simply homeschooling during a "normal school year" with summers off. We have always preferred to use workbooks in our daily lessons, because they seem to thrive with this method of having a sense of accomplishment,  as well as a deep understanding of the subject. Many would use the term, "eclectic" to describe our approach to homeschooling. Though the focus is on workbooks based on a comprehensive curriculum of the grade level, or individual subject content, my children learn in many other ways as well. We utilize different aspects of real-life situations to incorporate into their education. There could be something as simple as a math lesson at the store, a history lesson while traveling, or a science lesson at the zoo. Other than workbooks and hands-on activities, they read for at least 30 minutes a day at a level that is appropriate for them. I let them choose the books they read and what they want to read about, whether it be fiction or non-fiction, as long as they are challenging and not too easy. They are also involved in extracurricular activies twice a week, like dance and piano,  which provides them with an appreciation of music, as well a  physical and social outlet. We have also recently implemented a foreign language into their daily lessons, giving them a head start on their high school credits. If you have the time, patience, and organizational skills, then you are on the right track to be successful at homeschooling at an accelerated pace.

Wednesday, March 26, 2014

Easy White Bread Loaf

Successfully making a not only edible, but tasty loaf of bread has been surprisingly difficult for me, until I found this easy recipe for a white bread loaf. I have encountered numerous problems when attempting to make bread; from the wrong type of flour to over-heating the yeast. I was beaming when I pulled this loaf out of the oven. This white bread loaf came out with a soft crust and fluffy center.
Prep Time: 3 hours
Cook Time:45 minutes
Total Time: 3 hours,45 minutes
Ingredients:
3/4 cup warm water
1 package active dry yeast
1 tsp salt
1-1/2 tbsp sugar
1 tbsp vegetable shortening
1/2 cup milk
3 cups all-purpose flour (approximately)
Preparation:
In large bowl, add the warm water. Slowly stir in dry yeast. Continue to stir until yeast is dissolved.
Add salt, sugar, shortening, and milk to bowl. Stir.
Mix in the first 2 cups of flour.
If needed, begin adding more flour, one tablespoon at a time, until the dough chases the spoon around the bowl.
You do not need to use up all the flour called for in this recipe, or you may need more flour than called for. The amounts vary depending on many factors, including weather, which is why most bread recipes only give an approximate amount of flour needed.
Turn dough out onto floured board and knead, adding small spoonfuls of flour as needed, until the dough is soft and smooth, not sticky to the touch.
Put dough in buttered bowl, turn dough over so that the top of dough is greased. Cover and let rise in warm spot for 1 hour.
Punch down dough. Turn out onto floured board and knead.
Preheat oven at 375 degrees F. 
Form dough into loaf and set in buttered bread pan. Cover and let rise for about 30 minutes.
Score dough by cutting three slashes across the top with a sharp knife. Put in oven and bake for about 45 minutes or until golden brown.
Turn out bread and let cool on a rack or clean dishtowel.

Friday, March 21, 2014

Pretty Pancakes

I made these pink, purple, blue, and green heart-shaped pancakes for my daughter's 7th birthday breakfast. She was not feeling well, so breakfast in bed with pretty pancakes and a candle to top them off, was a necessity to keep her in good spirits on such a special day.

Saturday, March 15, 2014

Cinnamon Roll Waffles

Thank you to Pinterest for giving me this easy idea of using the Pillsbury canned cinnamon rolls in my waffle maker for a sweet breakfast. Then drizzle the icing, just like syrup, all over. Yummy!

Wednesday, February 5, 2014

Cake Pops Really are a Tasty Treat

Cake pops have become a very popular sweet with an easily festive presentation. Several months ago, my husband had a lady bring some cake pops to taste in hopes of the opportunity to sell them in our deli. Unfortunately, they did not taste like cake at all, more like the uncooked cake batter.  I decided to give them a try because of their versatility, and they can be made for so many different occasions.
This is the way I made my first cake pops.
Ingredients:
Yellow box cake mix
white icing
Vanilla wafers
First, I cooked the cake as instructed on the box and let cool. Then I crumbled the cake and added a small amount of icing. Not too much, just enough to be able to form the balls. This is the reason some cake balls taste too gooey, because there is too much icing added at this step. Next, form small, 1 inch balls onto a cookie sheet. After the balls are formed, let them cool in the refrigerator for at least 45 minutes. Pull the cookie sheet of cake balls out and start to heat some of the vanilla wafers. I prefer to melt my wafers in a microwavable safe bowl at 30 second intervals until the consistency desired for dipping. Dip the tip of the pop sticks into the melted vanilla wafers about half an inch. Then put the sticks into the cake balls and put back in the refrigerator for another 30 minutes. Once the pop sticks have set into the cake balls, melt the rest of the wafers and put into a container deep enough to dip the cake balls, and not have to twist them. Twisting the cake pops might result in the cake to crumble (cake pop catastrophe)! After the cake pop has been dipped into the melted vanilla wafers, place the stick into a foam ball to decorate, or simply let set. I used a red cookie icing to decorate these, but plan on using different decorating methods in the future. Sprinkles would be a great additive, or even adding food coloring to some of the left over melted vanilla wafers to make my own icing decorations is another idea.

Sunday, February 2, 2014

French Texas Toast

French toast is one of my favorite breakfasts to make, because it is simple and delicious. I prefer to use Texas Toast rather than regular, plain, white bread to make the meal more filling. Sometimes, I will top the French Toast with fresh, cut strawberries for a bit of a healthy start to the day.
Ingredients:
Eggs
Whole milk
Vanilla extract
Cinnamon sugar
Confectionery sugar
Texas Toast
I start by deciding how many eggs to use, generally going by a 1:1 ratio of eggs to bread slices. Since I have four young children, I often have to cook at least six french toasts.
Directions yielding serving size of 6 Texas French Toast:
 
Crack 6 eggs into a large bowl, add approximately 3/4 cup of whole milk, 1 tablespoon of cinnamon sugar, and a teaspoon of vanilla extract. Whisk until well mixed, then turn on oven top to medium to high heat, and grease a flat iron griddle with either PAM or lite butter. Once the griddle is hot, start dipping the Texas Toast into the mixture, and place onto the griddle. After the French Toast is cooked on both sides, put on the plate and sift a teaspoon of confectionery sugar on the top. Placing fresh fruit such as strawberries, or blueberries, adds color to the plate, and plenty of flavor to the dish.

Sunday, January 26, 2014

Southern Breakfast on a Cold Winter Morning

Southern style sausage gravy and biscuits makes for the perfect breakfast on those particularly cold mornings. I love giving my children a taste of my family's southern flavors. Here is the way I have learned to make a delicious sausage gravy:
Cook a whole Genoa sausage (mild) in a large frying pan into small crumbles. Many people then add regular flour, but I use a seasoned flour and completely cover the sausage. Then I add whole milk until there is about three times as much milk then sausage, and bring to a boil. I also add a small amount of sugar to taste, because the spice of the sausage is sometimes too prominent for my children. After the milk is boiling, I stir and then let simmer. Once thickened, I pour onto large biscuits and serve. Yummy!

Monday, January 20, 2014

Pita Pizzas using Left Over Spaghetti Sauce

Pita Pizzas are always a favorite with my kids, and even better they are healthy. Today, I decided to use left-over spaghetti sauce and spread on the pita, topped with some shredded mozzarella and cheddar. After it baked, I sprinkled some grated parmesan on top. Delicious!

Friday, November 8, 2013

Holiday Treats

These Muddy Buddies are chex, deliciously covered in chocolate, peanut butter, and powdered sugar, which are sure to please.

9 c. Chex cereals (corn, rice and/or wheat)
1 c. semi sweet chocolate chips
1/2 c. peanut butter
1/4 c. butter
1/4 tsp. vanilla
1 1/2 c. powdered sugar
Pour cereal into large bowl and set aside. Combine chocolate chips, peanut butter and butter in 1 quart microwavable bowl. Microwave on high for 1 to 1 1/2 minutes or until smooth (stir after 1 minute). Stir in vanilla. Pour chocolate mixture over cereal and stir until all pieces are evenly coated.
Pour cereal mixture into large container (with seal) with powdered sugar. Seal securely. Shake until all pieces are well coated. Spread on wax paper to cool. Store in an airtight container. Makes 9 cups.

Monday, October 21, 2013

A New Take On S'mores

I saw these s'mores on Pinterest and decided to give them a try. They are very easy to make and taste even better. All you need is a bag of giant marshmallows, chocolate for dipping, and crumbled graham to cover the chocolate.

Sunday, October 20, 2013

Halloween Pretzel Sticks

Pretzels and chocolate are a decadent combination that make for the perfect craving of something salty and sweet. These pretzel sticks were dipped in white Ghirardelli chocolate, and decorated with Halloween colored sprinkles for a festive treat.

Thursday, October 17, 2013

Workbooks Galore

There are many different approaches to homeschooling. Every family has to choose which curriculum works for them and their schedule. For our family, workbooks have always been the most beneficial way for our children to learn, because they utilize reading, tangible activities, as well as a sense of achievement upon completion of each section of the workbook. Currently, I have a Second Grader, First Grader, and a pre-preschooler. Needless to say, we have tons of completed workbooks. I am the homeschooling mother that saves everything, and I needed somewhere to store the books. Most of the workbooks are multi-subject, and full comprehensive curriculum, making them very heavy. We use filing bins, because the workbooks store perfectly, and the bins can be labeled with names and grades on the side.

Reuse!

We bought this beautiful dollhouse with all of the realistic furniture for our daughters, and they loved it for about a month. Soon they were on to playing with baby dolls, dress-up, and video games. When our first son started to crawl and get into anything in his reach, all of the dollhouse furniture was put away, and we had an empty dollhouse. We needed somewhere to put books, DVD movies, and video games. I decided to reuse the pointless empty dollhouse into a perfect bookcase. Now, the boys do not have choking hazards, and we can utilize the space!

Wednesday, October 16, 2013

Baklava!

My mother-in-law makes the most delicious, authentic Lebanese food, and introduced this wonderful dessert to me. I have been practicing for years to get as close as possible to her mouth-watering baklava. The process is time consuming, but well worth it in the end.


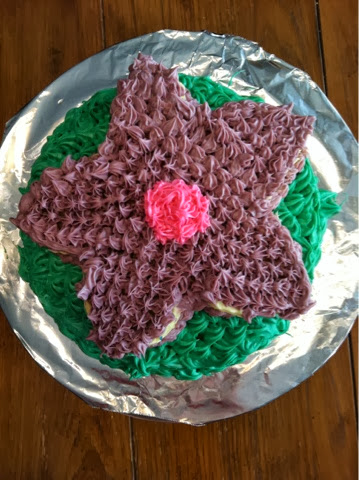
Easy Purple Flower Cake

I made this cake for my Mother's birthday. She loves the color purple, and I thought a flower would make a pretty cake for her. I used yellow cake and baked it in two 8" circle baking pans. Then I put them in the refrigerator for at least an hour to cool, prepping the cakes to be cut and shaped. I added green food coloring to vanilla icing for the grass,  a small amount of red food coloring to the vanilla for the pink center of the flower, and a raspberry flavored purple icing for the pedals. Once the cakes cooled, I started by applying the green icing (grass) to the first circle shaped cake, making the base layer of the cake. Then, I cut the top circle cake into the desired shape (a flower), and applied the purple icing. I added the pink center and vanilla sides to the flower last. The cake tasted delicious and was super easy!

Tuesday, October 15, 2013

Learning Sight Words

Learning sight words is an essential part of gaining the ability to become an independent reader. I have been using these wonderful printables found at www.havefunteaching.com for my 4 year old daughter to practice her sight words. Every time she knows a word we highlight the word. Once she can read a whole column of words, she gets a sticker on that column. When she is able to read a whole page of (100) sight words, she gets a certificate of completion.

Easy Horse Cake Idea!

This is a cake I made for my daughter's 6th birthday. I baked the cake using two 8" circle baking pans. Let the cakes cool in the fridge for at least an hour. For the icing, I used chocolate and vanilla, which I added green food coloring to vanilla icing for the grass, and a little red food coloring to make the pink. After the cakes cooled, I cut one of the circle cakes into the desired shape (horse's head). I put the green vanilla icing (grass) on the bottom circle first. Then I put the horse's head on top of the base and started decorating the top layer. My daughter absolutely loved it. The best part was that it was easy!